8IGHT-X/E 2.0 Build the Perfect Nitro or Electric Buggy
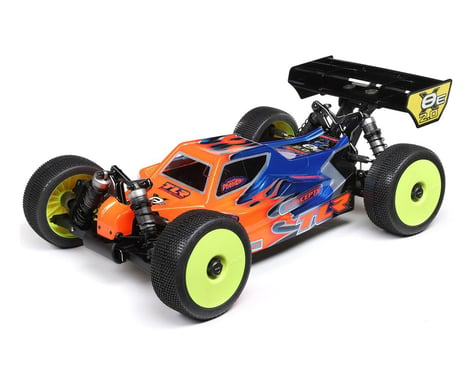
The Losi 8IGHT-X/E 2.0 builds off the successful 8IGHT-X platform and provides you with more versatility than ever before. This X/E variant gives you the choice to build a track worthy nitro or electric buggy. Other key updates include revised drivetrain, suspension geometry, differential access, and chassis layouts. This 2.0 buggy gives you podium level features ready to hit the track. How will you power the 8IGHT-X/E 2.0?
About the 8IGHT-X/E 2.0
Nitro or Electric?
You decide! Losi built this buggy to give users the choice of how they want to build their performance buggy. The center differential mount comes in either a motor mount or brake mounting version. For electric, an updated shell for added durability and better power transfer. Nitro drivers will find better brake cams allowing for a more consistent brake feel during extended runs. The best part of either setup is the parts to build either an electric or nitro buggy come in the box!
Chassis & Bulkheads
The chassis is formed from a piece of 7075 3mm aluminum and braced by durable side guards. The chassis features a cutout for the flywheel, engine mount, and motor mount. Building off the chassis are the front and rear bulkheads. These bulkheads feature quick access differentials to make maintenance and repairs a breeze. Every point of this chassis is designed around versatility and adaptability.
Suspension
Having a chassis that can be electric or nitro is one thing, having a performance buggy is another. Losi made a buggy that does both! The suspension geometry has been heavily updated to make the buggy more nimble and easier to drive. A wider front pivot, narrower rear pivot, updated hubs, longer suspension arms, more suspension mounting points, and more allow for fine tuning and setup changes that allow you to drive this car hard into the corner and blast down the straightaways.
Features
- Includes parts to build either a Nitro or E-Buggy
- 7075 3mm Aluminum Chassis
- Tunable Front and Rear Shock Tower
- Updated Front Spindles
- Balanced Radio Tray
- Adjustable Steering Rack
- Big Bore Emulsion Shocks
- Adjustable Caster Blocks
- Quick Access Differentials
- Lighweight & Rigid bulkheads
Includes:
- (1) Losi 8ight-X/E 1/8 4WD Kit
- (4) 1/8 Scale Wheels
- User Manual
Needed to Complete
- (1) Steering Servo
- (1) Transmitter & Receiver
- (1) Compatible Charger
- (4) 1/8 Buggy Tires
- Electric:
- (1) 1/8 Brushless Motor & ESC
- (1) 4S 14.8V LiPo Battery or (2) 2S 7.4V LiPO Shorty Packs
- Nitro:
- (1) Nitro Engine and Tuned Pipe
- (1) Receiver Battery
- (1) Receiver Switch
- (1) Throttle Servo
- (1) Fuel Bottle
- (1) Starter Box
- 20-30% Nitro Fuel
Specifications:
| Scale Size | 1:8 |
|---|---|
| Terrain | Off-Road |
| Body Style | Buggy |
| Drive | 4WD |
| Length | 18.9in (480mm) |
| Width | 12.1in (308mm) |
| Wheelbase | 12.7in (323mm) |
| Weight | Varies |
| Power Source | Nitro or Electric |
| Assembly Level | Kit* |
*NOTE: RC Kits are an unassembled Remote Control Model that require assembly, racer selected electronics, and other racer provided items. Photos of assembled kit are for illustrative purposes only. For a complete list of needed items to drive this kit please see the list above.
Manuals:
User Manual
Parts Diagram
Setup Sheets
Electric: Editable
Electric: Blank
Nitro: Editable
Nitro: Blank
This product was added to our catalog on July 21, 2022
1. Body rests on top of 4268 size motor so sits higher than battery side when mounted. This is using the kit included 16t pinion.
2. Body rests on top of Hobbywing XR8 esc; if you plan to use that esc, as they have mounted on their product page. I have not tried the Tekin esc Losi suggests as in their “complete your product” since it was on back order. I imagine the product images with the brushless conversion installed were taken prior to adding a brushless system.
3. Mounting position for esc means pushing power button and receiver connection hard against receiver tray with little to no good routing option.
4. This applies to nitro and brushless setups: steering servo mount is extremely tight and will require either modification of it, or the servo you are using if you opt for one of the many popular servo options that have rubber boots around the wire connection to the servo.
5. You lose both chassis stiffening options used under the center differential and motor in nitro setup that does not exist for brushless setup.
For what is the most expensive buggy kit, at least if purchased via amain hobbies, I wouldn’t have expected to run into these issues.
Long version: For context, this is not the first kit I've assembled and I've been in this hobby for some couple of decades now. This is without a doubt, the hardest kit I've ever assembled. I recall reading somewhere that the estimated build time is three to five hours. I spent over 20 assembling this because of fitment issues on both parts included in the kit and parts that I chose to install in it, or rather was forced to change... more on that later. The gripes I have with this set vary from cosmetic, to four letter word flying fits that almost sent this thing back in it's box to maybe never be seen again. You can decide which issues are big or not.
Let's begin with this: Usually kits list clearly what you need to complete the set. Here is what the box doesn't list. These items may be a "duh" to seasoned builders, but not to everyone. Bonus, it includes a 16T pinion gear that the box says you need to purchase separately. Maybe they just want you to have an extra. Paint, Tires, CA Glue. Add these to the box. Side not, the box indicate a Tekin combo, but pictures a Hobbywing. Wow, it's the one I bought. That should be fine then. Brick battery... shortys on the box. Eh, just pick what you want. Anyway, someone who doesn't know and just buys it without asking questions will be making another trip and the LHS may be a distant drive. Might want to pick up an .050" allen wrench too while you're at it. It's the only SAE wrench you need for an otherwise all metric build. Doesn't make any sense to me either. Now on to the build. Where's that book??
Did I mention you need a scale that can measure to 100ths of a gram? Box doesn't mention that either. You'll find that in the diff assembly. The diffs assemble just like any others except that the manual instructs you to use a scale to measure exactly how much fluid to add. I have no such scale. Up to the middle of the cross pins and moving on. The front and rear shocks are slightly different colors, I hope that doesn't bother you; I can't unsee it. That's not the only problem; the instructions don't reflect the correct washer in the exploded diagram. The image illustrates a flat shim and the part number shows the actual washer. The bleeder caps are a nice touch. I'll give them that. Also, no weight requirement for the shock oil. Just fill 'em up and bleed 'em off. This next one is my favorite. Page 18 in the book The upper arm assembly indicates scale widths to build them to. The scale of the drawing is right, but the set for the rear arms is WAY wider than it should be. If you assemble to spec your back wheels will have double digit degrees of positive camber. Page 32 indicates that these problematic arms are affixed using the center holes which will add even more positive camber. Mine landed on the outer holes. Page 36 is really where this book should stop and split off into a choose your own adventure book with separate instructions for E-Buggy or Nitro. Also, these parts should be separated. Page 7 says you should only open one bag at a time during assembly. This is the part where you forget that line as you won't find all of the screws you need until you open further bags, so lay out a towel and dump your parts out. You'll be doing some hunting now. If you can't tell by now, I chose the electric flavor to build mine in, so I can't describe the nitro assembly troubles as I didn't go through them. The side guards go on on page 43, but you might want to skip to page 49 and put those straps on the battery tray now rather than trying to contort your fingers in later to get them in. You might have purchased a very popular high torque/speed servo with a modular rubber booted pig-tail plug. You'll have to trim that rubber boot off. Also, there is ZERO room for the wire to squeeze between the servo body and the mount. You have a dremel, right? It would have made too much sense to mold it with some clearance for the wire and I thought the EB48 was tight...anyway. The RX-482 receiver with the built in antenna is neat. Too bad it doesn't fit in the radio box in the upright position that the instructions prescribe since the radio box cap is too short. Just throw it in the box and grab your 472 instead since it's the only RX that you have that will fit. In addition, you'll need to put your lap counter in the radio box too since there are no mounting screws to affix it. Write that number down before you have to open the box again to find it. The hobbywing xerun 4268 motor (Hey, this is the one on the box!) will hit the body with the included 16T pinion gear installed and set to the correct gear mesh as the body doesn't allow enough clearance. To be clear, this is with the solder tabs turned to the side and not the top as the manual illustrates. The body still touches the back of the motor and doesn't sit straight as a result. The acumen is SUPER SMOOTH on this. This design is probably the nicest feeling one I've put together and has a very nice action. Good job on that. The nose of the body, however, no. That thing is going to fly off the first time it hit the track.
Okay, rant is over. I bought this one because the local track and shop recommended it over the other one on the shelf made by another company with decades in the business and (ding ding ding) they stock parts for it. This unit is priced a healthy bit over the competition and has too many headaches to deal with for me to recommend it. I really wanted to like this buggy, but I feel I could have chosen better. If I hit the track with it and the experience is THAT much better than the Tekno I replaced with it, I'll edit the review to reflect that, but at this point, I'm not impressed. There are so many things about this model that should have been better. The total lack of coverings for the engine mount and flywheel holes is a big one. One plastic mold could have cleaned that up so well and it's not there. I'm going to run it and the frustrations of assembling this thing will fade over time.

